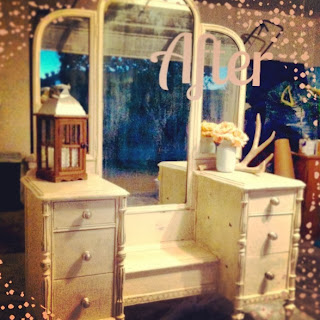
Its reveal day for my first custom client project.
I feel so excited to post about it.
As I said in a blog post a while back, my friend/client/hairdresser purchased this antique piece from a friend of hers. She bought it for her 2 year old daughter's new big girl room. I felt so honored to be trusted with such a beautiful piece that I knew she would be keeping around for a long time. I was anxious and excited at the same time to get to work on it.
It was beautiful before.......
We went back and forth on the plan and how brave we wanted to go with it. Sometimes when a piece is this pretty to start with, its hard to imagine it all revamped with a fresh new look. I knew it would be fun project. My friend and I had some great ideas to make it stand out, but in the end we decided to keep it classic so that the piece could be pretty transitional in her new home without having to redo it again.
We went with an antique white in color with a coffee glaze and heavy distressing. I was so excited to see how it all turned out.
Here is a little info about the process
First things first, I taped off the mirrors as to not hurt the beautiful natural aging of the mirror on this piece. It was gorgeous, so I took special care not to touch it with a drop of paint.
Next it was time for paint. I did 3 to 4 full coats of antique white paint on the piece to make sure and get a lasting coverage.
After the three coats of paint, I stood back and took a look and thought it was a little boring. I couldn't wait to go after all this great detail with a coffee glaze.
And so I did. Isn't the difference amazing! A dark glaze makes those details just PoP!
I ended up glazing the whole piece rather than just the details. I felt like this piece had a lot of character and aging it by glazing helped to give it back some of that special stuff.
After glazing and distressing with my sander and smoothing down the surfaces with sand paper. I put 3 coats of sealant on the piece to make sure it could take some wear and tear.
I let it dry overnight and TA DA! The finished piece with hardware and all! Its is gorgeous! The picture truly doesn't do it justice! I love it so much and I hope that my client will as well.
My NeSt selfie! Hi there! Just wanted to get a straight on shot of it which can be tricky when there are mirrors involved.
A close up of the glazing and hardware. I believe the client is going to add her own hardware that she already picked out, but I just had to dress her up all fancy while she was still in my possession.
And a final close up of the heavy distressing. This particular client wanted very heavy distressing. This is how I like my pieces as well, so that worked out very easily with me. I love the irony of an antique piece with gorgeous bling hardware on it that has heavy distressing. Its so unexpected which makes it so special to me.
And there you have it! The before and after and a sneak peak at a how to refresh your furniture.
I hope you like it! I love it!
Thanks for stopping by my NeSt!
Check NeSt out on FB and like our page. Message me or leave a comment on this blog if you are interested in having piece done or looking for a piece already done a certain way. I will be posting projects for sale often.
-B-


No comments:
Post a Comment