Tuesday, March 3, 2015

Long Time No See!

Man it's been a while.  Such a tragedy because I absolutely love blogging.  I started NeSt about 17 months ago and almost simultaneously accepted a full time job with the intention of using that income to grow NeSt.  It worked for a month or two. I was able to buy myself some fancy equipment that helps my end product to be much better, advertise to get things rolling, and invest in some awesome furniture to paint.  Then things got busy.  I have been blessed since the beginning of NeSt to have a steady flow of custom orders each month.  Having a full time job on top of that left me little time to do anything with NeSt but just try to keep up with the orders that I already had. 
Here I am 17 months later and I finally quit my full time job to focus on my passion.  I am so excited to start this new adventure for real this time and to see what happens next.  I have been so blessed with the best customers.  I can't wait to continue to serve you and your furniture updating needs in the years to come.
Please contact me at britdwinell@gmail.com for a quote or consultation. Thanks for stopping by
-B-

Monday, December 2, 2013

Christmas Decor! Yippeee!

It's my very favorite time of year.  Oh yes, I am one of those people that has to really work hard to NOT decorate for Christmas before Thanksgiving is over.  Especially on a year like this one where there are only 3 weeks between the two decadent holidays.  We were traveling for Thanksgiving this year so I used that as the perfect excuse to start Christmas décor a wee bit early. 

So what I want to convey in this post is that it doesn't have to be expensive to be fabulous.  That is one of the principles that NeSt stands on with the furniture I do, and the same goes for Christmas décor.  If you are into all things Rustic and Chic like me, you can do this on a very small budget with a little creativity. 


I have loved these burlap pillows with the Christmas stuff stamped on them.  Of course you can hop on over to ETSY and buy you some, and support a small business while you're at it.  But, if you are low on funds and want to try it yourself, its as simple as tracing some stencils in fabric paint onto a pillow that you either make or buy.  I've done this before and it turned out super cute.  I also want to note all the plaid touches in this pic are as simple as going to the good ole Hob Lob and having them cut you off a yard or two of flannel fabric in a plaid that you love and hanging it over the chair or down the middle as a table runner.  You don't even have to finish off the edges.  Unfinished stringy edges is part of the charm if you ask me.  I'm a little quirky though, so feel free to get some stitch witch if those kinds of things bother you. 
The shutters in the back ground can be found at garage sales easily and just need a quick coat of paint and some light sanding to be rustic, shabby, and add tons of texture. 
Photo: celebratingeverydaylife.com
 
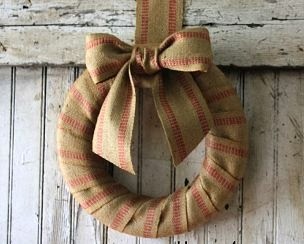
This wreath is so cute and very Pottery Barn.  In fact, I believe the tree in Pottery Barn has this very jute ribbon on the top of it this year.  I'm here to tell you a little secret.  This ribbon is sold at Hob Lob and Walmart for $3 a spool.  The wreath from underneath it cost no more than $1.50 at Hobby Lobby.  Its super cheap ya'll, and super cute!  Who knew Pottery Barn shopped at Walmart to stage their photos. 
Photo: hometalk.com

I'm dying to do this for my house someday. I planned on it this year, but you lovely folks are keeping me beyond busy with furniture orders so I just haven't found the time.  Its literally just a big piece of plywood painted on and beat up.  Love everything about it! That little tree can be found at Home Depot and the galvanized metal bucket it is in can be found at any local feed store for next to nothing.  Perfection! 
Photo: salvagesecretsblog.com
 

This is one of my favorites.  Its a tomato
thingy!!!!  Duh!  Wrapped in lights galore and adorable!  So inexpensive and so easy!  Sooooo much cuter than the ones you can buy. 
Photo: nedesignbuild.com
 
Sprigs of rosemary, bought at your grocer, and little tags from Hob Lob off the office supplies aisle.  Genius, rustic cuteness at its best!  I'm totally doing this one this year.  I just love it!  It probably smells pretty amazing as well under your tree. BONUS!

This sign on the mantel is so cute and can be made out of left over fence post.  Just use a simple saw to even up the edges, liquid nails to hold it all together and some red acrylic paint with you best handwriting to do the rest. I love it!  
 Photo: notmyownlife.BlogSpot.com
 
The next several are just little easy to print sheets that I print out on a color printer and just stick in frames that I already have out with family in them.  I just cover the pic with this sheet of paper and wa la!  Christmas décor.  I've done each of these in my home and I love them.   Just save the pics to your computer and print from there.
Photo: rambling renovators
 

Photo: sycamorestreetpress.com
 
 This one is fun for the kiddos because they can add a cotton ball to t
he day and complete Santa's beard as Christmas get's closer.  Sometimes something as simple as this can calm the anxiety and excitement that they feel trying to wait patiently for the day when the bearded man comes. 
Photo: invitingprintables.blogspot.com

I hope you enjoyed all of my inexpensive ideas for decking the halls this Christmas.  Now, go feather your NeSt! 
 
Thanks for stopping by.
 
-B-

Thursday, October 10, 2013

Thrifty Thursday!

Thrifty Thursday is my day to showcase a super inexpensive d.i.y project.  This week I decided to add something fun to my dining room table for Fall.  I knew just what I wanted to do.
 
A few years ago, I found this old wooden tool box at a garage sale in the hill country of Texas.  It was filled with Copper pipes and what not and he was selling it for $15. I'm sure the copper in it was probably worth way more than that, but I wanted it for the box the copper just happened to be in .  I turned out using the copper for some random stuff around the house and the box has been in the garage ever since.  The kids had gotten to it now and then with my spray paint and so it needed to be covered somehow. 
 
This is what it looked like before.....
Just an old wooden tool box with random splashes of white primer> on it from the kids.  It needed some work. 
 
I thought I'd give it some Chevron love.......who doesn't love a little Chevron love?
 
I just used thick painters tape to mark off an area criss cross like Chevron. I just eye balled it because I feel like I wanted it to be slightly imperfect.  You could get all technical and measure and use your protractor etc., but I didn't.

Next I took my little sharp blade and cut off the excess to make those nice clean lines.


While the tape was on, I took to it with a can of Rustoleum turquoise/aqua spray paint.  This matches my house, but you could do any color at all. Next, I ripped the tape off as soon as I was done painting to avoid bleeding under the tape.  This is a painter trick I've learned the hard way......
 

and of course, because I love all things rustic, I just couldn't leave it looking all pretty.  I went after it with my sander and sanded it down to take a bunch of my paint off. After I sanded I glazed it in Martha Steward Coffee stain.  If I had it to do over again, I would have skipped this step.  I don't love glazing, but I thought it would look good on this piece.  In hind site, I would have rather left the wood natural then to stain it a coffee darker color, but whatev.......its my thrifty project. 

 
And here it is sealed and happy on its new home, my dining room table, this morning as the light flooded in the windows.  I think it turned out super cute for being a 20 minute and $15 project. 

 
Thanks for stopping by my NeSt!  Have a happy Thursday! 
 
-B-


Tuesday, October 1, 2013

Inspired by Emily and Merritt

If you aren't busy, or even if you are, stop what your doing (right after you read my post that is ; ) and go to Pottery Barn Teen to check out the Featured Designs by Emily and Merritt.  Not only do they make everything beautiful fashion wise, but it looks like they have nailed it as far as all things whimsy and bling go for little girls rooms.  I died!!!!!

I love every single thing about this collection. Its perfectly mixed with whimsy and preppy, glitter and rustic.  I want it all!  I feel so inspired by it all today, I just had to share!

These profile silhouettes are amazing!  So cute, and probably fairly easy to DIY. 


I am redoing the twins room right now in a rustic/lodge kinda theme.  I'm thinking this is a must for their bedside or chair side table.  They may not agree, but they don't pay the bills.  Ha! 
 
I want this clothing rack and everything on it, but mostly the rack. 
 I'm such a sucker for ticking and pin tucking.  When you combine the two and then add in that its on a comfy beanbag chair.......done!  Perfection!
 Who said denim can't be chic?  This is all kinds of amazing.  I might just have to have it for my bedroom along with another of those little log tables.  LOVE, LOVE, LOVE!
 The daughter is definitely getting this one for Christmas.  So cute! 
 I've always wanted a horse or cow head like this, not necessarily Gold, but whatev.  I can't even wrap my brain around being a 6 year old little girl and having a "real" unicorn head on my wall.  Duh?
 And again, unicorn love......I like the elephant too.
 This is a nice pic of a lot of the collection.  Go check it out over at www.potterybarnteen.com, you will not be sorry, I promise!

 
In the meantime, if you see something you love furniture wise but can't afford these prices........NeSt can copy  many of these looks. In fact the white antique distressed is my specialty.  Give me a call or email me at britdwinell@yahoo.com, 817-781-8441.
 
Thanks for stopping by my NeSt!
 
-B-

Monday, September 23, 2013

Reveal Day Before & After!


 Its reveal day for my first custom client project.
I feel so excited to post about it.
 
As I said in a blog post a while back, my friend/client/hairdresser purchased this antique piece from a friend of hers.  She bought it for her 2 year old daughter's new big girl room.  I felt so honored to be trusted with such a beautiful piece that I knew she would be keeping around for a long time.  I was anxious and excited at the same time to get to work on it. 
 
It was beautiful before.......
 
We went back and forth on the plan and how brave we wanted to go with it.  Sometimes when  a piece is this pretty to start with, its hard to imagine it all revamped with a fresh new look.  I knew it would be fun project.  My friend and I had some great ideas to make it stand out, but in the end we decided to keep it classic so that the piece could be pretty transitional in her new home without having to redo it again. 
 
We went with an antique white in color with a coffee glaze and heavy distressing.  I was so excited to see how it all turned out.
 
Here is a little info about the process
 
First things first, I taped off the mirrors as to not hurt the beautiful natural aging of the mirror on this piece.  It was gorgeous, so I took special care not to touch it with a drop of paint.
 
Next it was time for paint.  I did 3 to 4 full coats of antique white paint on the piece to make sure and get a lasting coverage.


After the three coats of paint, I stood back and took a look and thought it was a little boring.  I couldn't wait to go after all this great detail with a coffee glaze.  
 
And so I did.  Isn't the difference amazing! A dark glaze makes those details just PoP!

 I ended up glazing the whole piece rather than just the details.  I felt like this piece had a lot of character and aging it by glazing helped to give it back some of that special stuff.
 After glazing and distressing with my sander and smoothing down the surfaces with sand paper.  I put 3 coats of sealant on the piece to make sure it could take some wear and tear. 
 
I let it dry overnight and TA DA!  The finished piece with hardware and all! Its is gorgeous!  The picture truly doesn't do it justice! I love it so much and I hope that my client will as well.
 
My NeSt selfie!  Hi there! Just wanted to get a straight on shot of it which can be tricky when there are mirrors involved.
 
 
A close up of the glazing and hardware.  I believe the client is going to add her own hardware that she already picked out, but I just had to dress her up all fancy while she was still in my possession.
 
And a final close up of the heavy distressing. This particular client wanted very heavy distressing.  This is how I like my pieces as well, so that worked out very easily with me. I love the irony of an antique piece with gorgeous bling hardware on it that has heavy distressing. Its so unexpected which makes it so special to me.
 
 
And there you have it!  The before and after and a sneak peak at a how to refresh your furniture.  

 
I hope you like it!  I love it!
 
 
Thanks for stopping by my NeSt! 
 
Check NeSt out on FB and like our page. Message me or leave a comment on this blog if you are interested in having  piece done or looking for a piece already done a certain way.  I will be posting projects for sale often. 
 
-B-


Thursday, September 19, 2013

DIPPED

 
 I'm usually not much of a trend follower. I like what I like and  I know it when I like it.
 
I can be a very quick decision maker when it comes to decor because of this.  I usually already have what I want in my head and when I see it, I know it, and its as good as done.
 
This dipped furniture trend "I LIKE"
 
Not every version of it, but these I think were done really well.
 
I'm not sure what I love more, the planked wall or the pastel dipped stools.  
 
 
I do pieces like this all of the time, who wants to go for the gold dip to spice if up a bit?
 
 
These chairs, I love, dipped or not dipped, but dipped is certainly fun.  The dog is super cute too don't ya think?
 
 
A lot of furniture revampers are pegged as "Shabby Chic" in style. I wouldn't be so quick to call myself that. I have a love for all things rustic, but I also think they take on a whole new life when you pair rustic with modern or industrial.  This pic is a perfect example of that. Those dipped stools make the whole thing work.
 
 
Again, something I do all of the time, just blingalicious! (my new word)
.

One of my favorite blogger's, Holly, at IN THE FUN LANE, does it again.  So simple and elegant yet unexpected.


Love these. Want one.  Melaine at MY SWEET SAVANNAH, my favorite blog, did a DIY that turned out so cute.  I might be dipping a tree stump as soon as I can find one.  
 
 
Pastel perfection.  Industrial table.......see what I mean. 
 
 
My very favorite piece I found.  So "NEST" if you will. I might have to do this one for myself. 


Have an IKEA stool that just needs something done.  DIP IT! 


So what do we think?
 
YOU DIP, I DIP, WE DIP? 
 
Thanks for stopping by my NEST!
 
-B-


Monday, September 16, 2013

Don't Throw It Away!

This weekend I was picking up my kiddos at my sweet In-Laws house after they gave my Husband and I a nice (and needed) date night. I was walking out and there was the cutest little stool just sitting there begging for me to steal it. I told her that I had some fun ideas for it and she commented   "Oh,  I was just going to throw it away."
 
NOOOOOOOOOOOOOOOOO!
 
If you know me, NEVER throw anything wooden that resembles furniture away!
 
Let me show you why.........
 
A simple unfinished REAL WOOD stool can be so many things.  Who doesn't need an extra seat now and then, or a plant stand, or a extremely small side table for a itty bitty space to set your glass?
 
A lot of the newer houses are doing these countertop/islands that extend out over the cabinetry to allow for a serving area or a "pull up a stool and sit" area.
 
This is a perfect opportunity to add a pop of color or a rustic twist to an otherwise sleek and rather industrial space.

SEE........... 


I see these stools everywhere for super cheap.  If the Mohogany wood isn't your thing, call NEST and we can add color and make it spectacular.
 
 
This is what I have in mind for the Mother In Law's cute stool.


Or this.......
 
 
So cute......

 
I'm always a sucker for the grainsack look.  This is padded, but NEST could paint this on too.


Another pop of color with a French twist. 

 
Staining fun. 

Love all of these ideas.  They could add so much personality to your room. 
 
SO NEVER THROW THEM AWAY!
 
Thanks for stopping by my NEST
 
-B-